In advance of the upcoming Streamr Marketplace for realtime data, we are publishing a mini-series of technical blog posts about data integration. This is the second post out of three:
- How to connect data to Streamr in 5 minutes
- Three patterns for integrating your data to Streamr
- Creating a product for the Streamr Data Marketplace
To learn the basics, check out the first part. This post will go into more detail about different kinds of integration patterns, and show real-world examples of each.
Table of Contents
The three patterns
We will cover three different patterns, each with their own pros and cons:
- Pushing from the source (ideal)
- Bridging from a streaming source
- Bridging by polling a source
Before we start
In Streamr, each data point belongs to a Stream. Data points (also called events or messages) are timestamped pieces of information, such as measurements from a sensor, or messages in a chat. Depending on the use case, a single Stream could contain data from a single source, or it could be a “firehose” of data from multiple sources.
Streamr ingests data via an API. The easiest way to interact with the API from your own software is by using a Streamr client library. Currently one is available for JavaScript, and other programming languages will follow.
If a library isn’t available for your language, you can call the API endpoints using any HTTP library. For simple examples of this, check out the previous post in this series.
To authenticate, you will need your API key. You can find and manage your keys on your Profile page.
1. Pushing from the source

Simplicity: Good
Latency: Good
Applicability: Medium
In this pattern, the data points are sent directly to Streamr by the source as soon as new data becomes available (for example, a sensor produces a new measurement).
This is the recommended pattern. However, depending on the circumstances, it may not always be available. It requires that you have control over the system that produces the data and can decide where it gets sent.
For example, if you are an IoT device manufacturer, you could add support for Streamr directly into your devices or gateways, enabling all your end users to easily connect their data to Streamr.
Various industrial data sources usually have good configurability for connecting the data anywhere you need to. However, consumer grade devices such as connected cars, phones, Fitbits, and others often force you to send your data to the manufacturer’s cloud, from where they might serve it back to you via an API. In these cases, you can use one of the bridging patterns in this post (see sections 2 and 3).
For a real-world example, here’s how to connect measurements from any number of Ruuvi IoT tags to Streamr. The devices transmit data over Bluetooth Low Energy to a gateway computer which runs this node.js script. A separate Stream is created for each found Ruuvi device, and the measurements are produced to the appropriate Stream as they occur.
Example 1: Push from the source example using the JS client
const StreamrClient = require('streamr-client')const ruuvi = require('node-ruuvitag')const API_KEY = 'MY-API-KEY'const client = new StreamrClient({ apiKey: API_KEY})const streams = {}console.log('Listening for RuuviTags...')ruuvi.on('found', tag => { // Create a Stream for this tag if it doesn't exist yet if (!streams[tag.id]) { streams[tag.id] = await client.getOrCreateStream({ name: 'Ruuvi ' + tag.id }) } tag.on('updated', async (data) => { const stream = streams[tag.id] try { // Produce the data point to the stream await stream.produce(data) } catch (err) { console.error(err) } })})For a more advanced example, see this post on how to set up a cold chain monitoring demo using Ruuvi tags, Streamr, and Ethereum smart contracts.
If your app is not in JavaScript, you can interact with the API directly using any HTTP library. See the previous post as well as the API docs for more information and examples.
2. Bridging from a streaming source

Simplicity: Medium
Latency: Good
Applicability: Medium
This pattern is useful when you don’t have direct control over the source, but a streaming API or some other kind of listener hook is available for the data. These allow you to be notified whenever new data occurs, enabling you to immediately forward the event to Streamr. Data that is typically available via these kinds of APIs are news feeds, financial market data and social media feeds.
Example 2a: Streaming bridge example using the JS client
Here’s an example demonstrating how to bridge DATA/USD market data from the Bitfinex exchange with a node.js script using a Bitfinex client library as well as the Streamr client library:
const BFX = require('bitfinex-api-node')const StreamrClient = require('streamr-client')const STREAM_ID = 'MY-STREAM-ID'const API_KEY = 'MY-API-KEY'const bws = new BFX('', '', { version: 2, transform: true}).wsconst client = new StreamrClient({ apiKey: API_KEY})bws.on('open', () => { bws.subscribeTicker('DATUSD')})bws.on('ticker', (pair, ticker) => { console.log('Ticker:', ticker) client.produceToStream(STREAM_ID, ticker) .then(() => console.log('Sent to Streamr!')) .catch((err) => console.error(err))})Example 2b: Streaming bridge example using MQTT module on Canvas
Instead of a program such as the one above, a Canvas process built in the Streamr Editor can be used to build bridges. This might work for you even if you’re not a programmer, although creating integrations usually still requires some technical understanding of APIs and protocols.
Below is a process which listens to real-time positions of trams from the MQTT API maintained by the Helsinki public transport authority. Incoming events are produced to a Stream in real time.
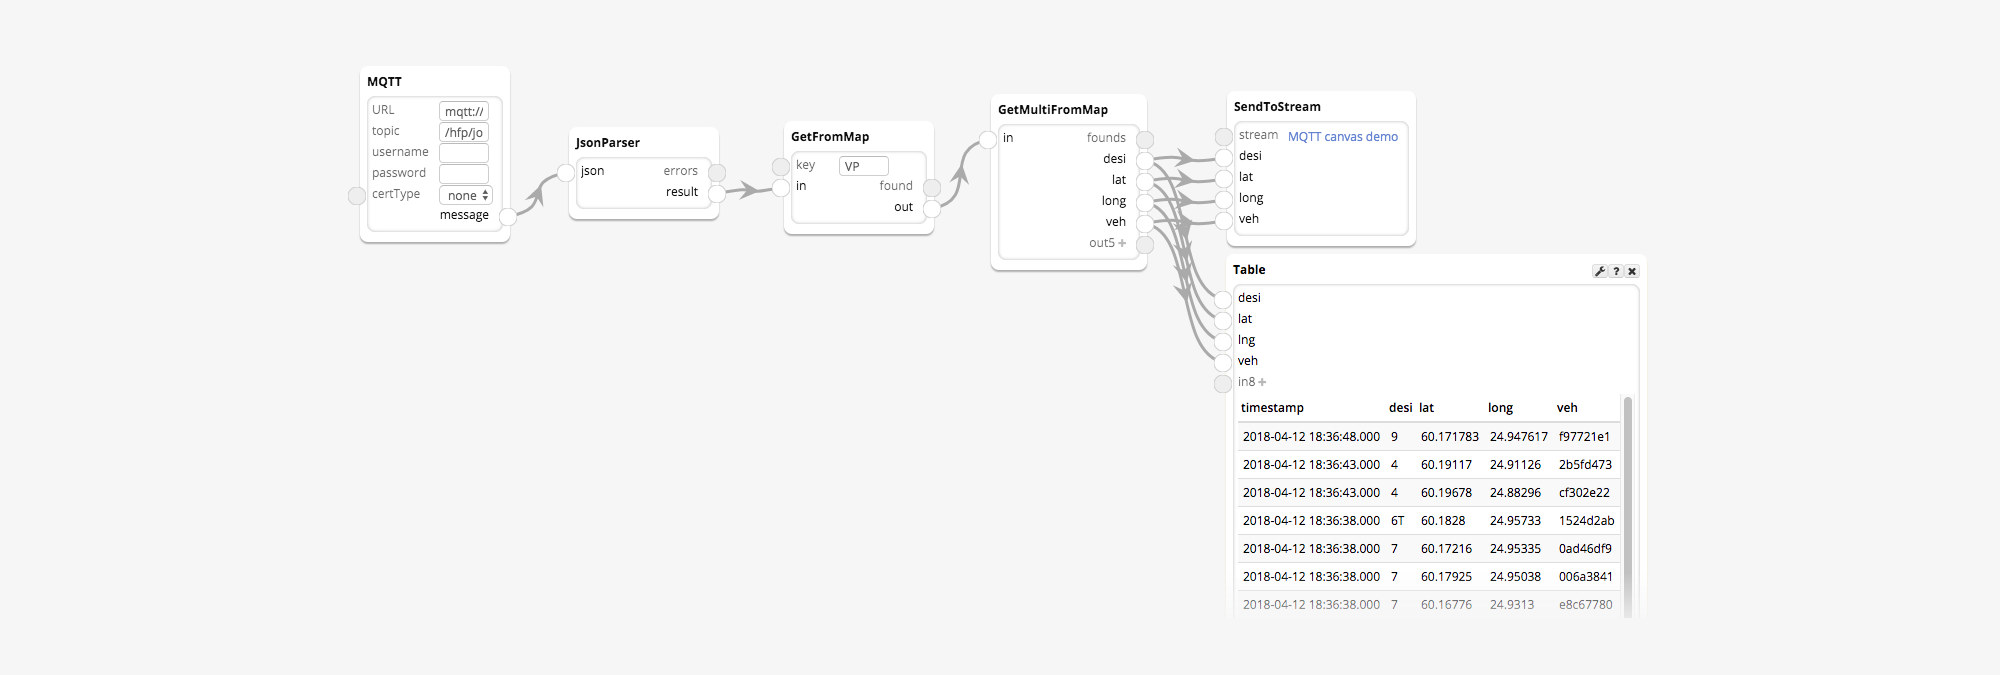
In this example the MQTT module parameters are:
- URL: mqtt://mqtt.hsl.fi
- Topic: /hfp/v1/journey/ongoing/tram/#
The MQTT module outputs JSON strings, which the JsonParser module parses to objects. From the data we extract the “VP” field, which itself is an object. We read the fields “desi”, “lat”, “long”, and “veh” and produce those values to a Stream using the SendToStream module.
3. Bridging by polling a source
Simplicity: Medium
Latency: Medium
Applicability: Good
Most cloud services handing out data at least offer a request-response-based API, which can be used if neither of the above push-based options are available. In this case there is no way to get notified when new data is available, which means that the API needs to be repeatedly queried. This is called polling.
It’s not an optimal way to serve real-time data, because:
- Data can be missed: multiple value changes in between subsequent requests are not observed.
- It places an unnecessary load on the API server, as requests are made “just in case” regardless of whether the data has actually changed or not.
- An average latency of half the polling interval is introduced.
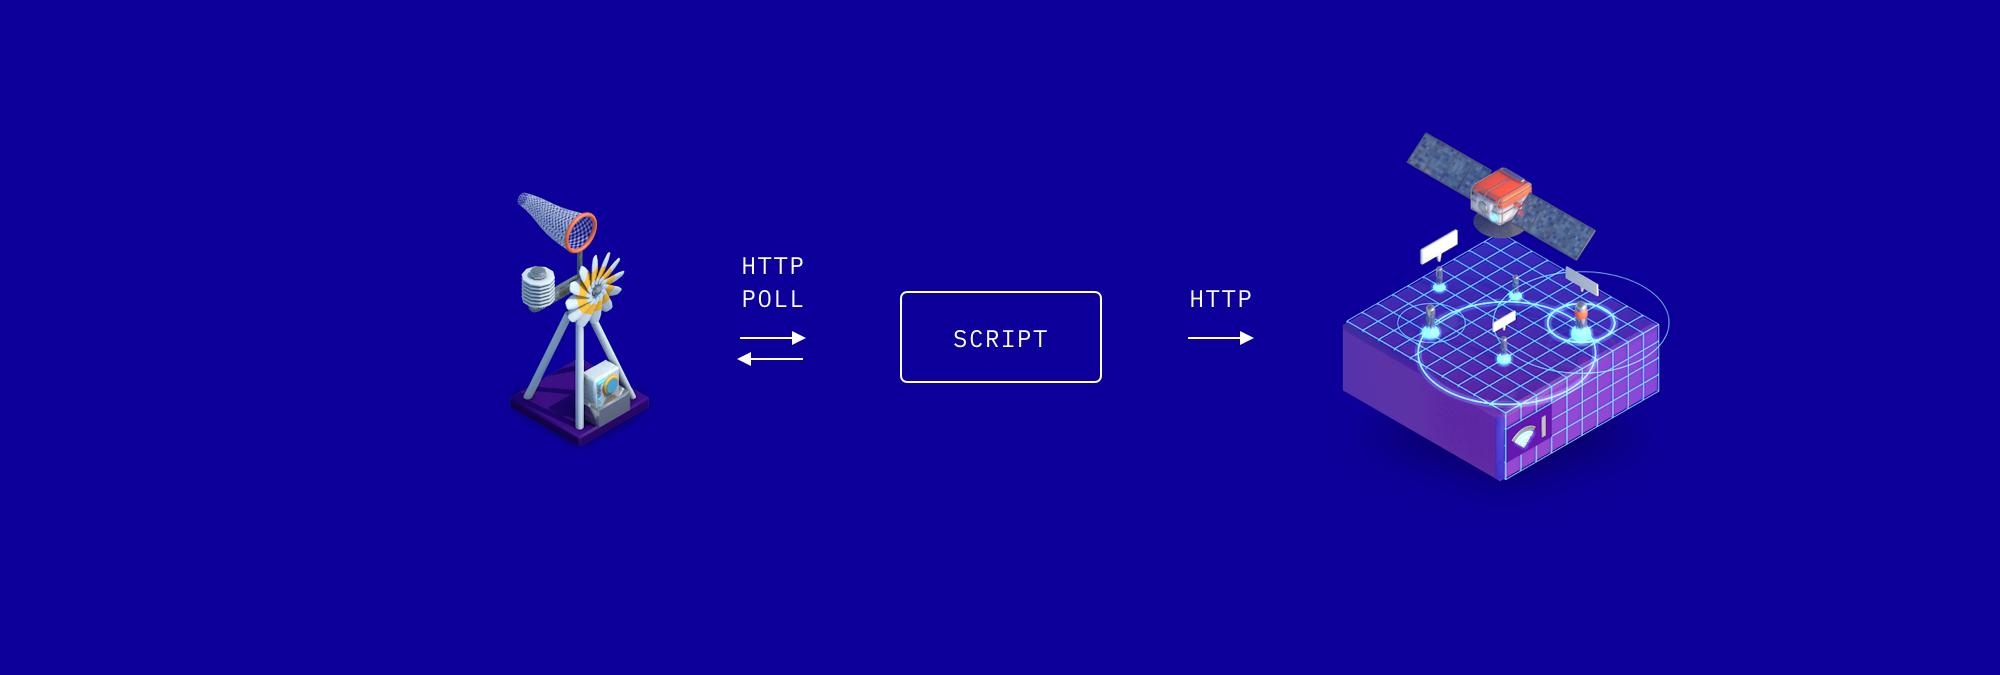
For the below examples, we’ll query the weather in Zug, Switzerland from OpenWeatherMap every 15 minutes. For this data, source polling is an acceptable solution for most use cases, since the weather usually doesn’t change rapidly.
Example 3a: Polling bridge example using the JS client
const fetch = require('node-fetch')const StreamrClient = require('streamr-client')const OPENWEATHERMAP_API_KEY = 'MY-OPENWEATHERMAP-KEY'const STREAMR_API_KEY = 'MY-STREAMR-KEY'const POLL_INTERVAL = 15 * 60 * 1000 // 5 minutesconst location = 'Zug,Switzerland'const client = new StreamrClient({ apiKey: STREAMR_API_KEY})// Query data from OWM and produce the result to Streamrfunction pollAndProduce(stream) { fetch(`https://api.openweathermap.org/data/2.5/weather?q=${location}&APPID=${OPENWEATHERMAP_API_KEY}&units=metric`) .then((response) => response.json()) .then((json) => { console.log(json) // Produce the data point to Streamr return stream.produce(json) }).catch((err) => { console.error(err) })}// Create a Stream for this location, if it doesn't existclient.getOrCreateStream({ name: `Weather in ${location}`, description: 'From openweathermap.org, updated every 15 minutes'}).then((stream) => { console.log(`Target Stream id: ${stream.id}`) // Poll and produce now pollAndProduce(stream) // Keep repeating every 15 minutes setInterval(() => pollAndProduce(stream), POLL_INTERVAL)}).catch((err) => { console.log(err)})Example 3b: Polling bridge example using the HTTP module
As before, using a Canvas is a potential alternative to a self-hosted script such as the one above. Let’s see what an equivalent Canvas would look like:
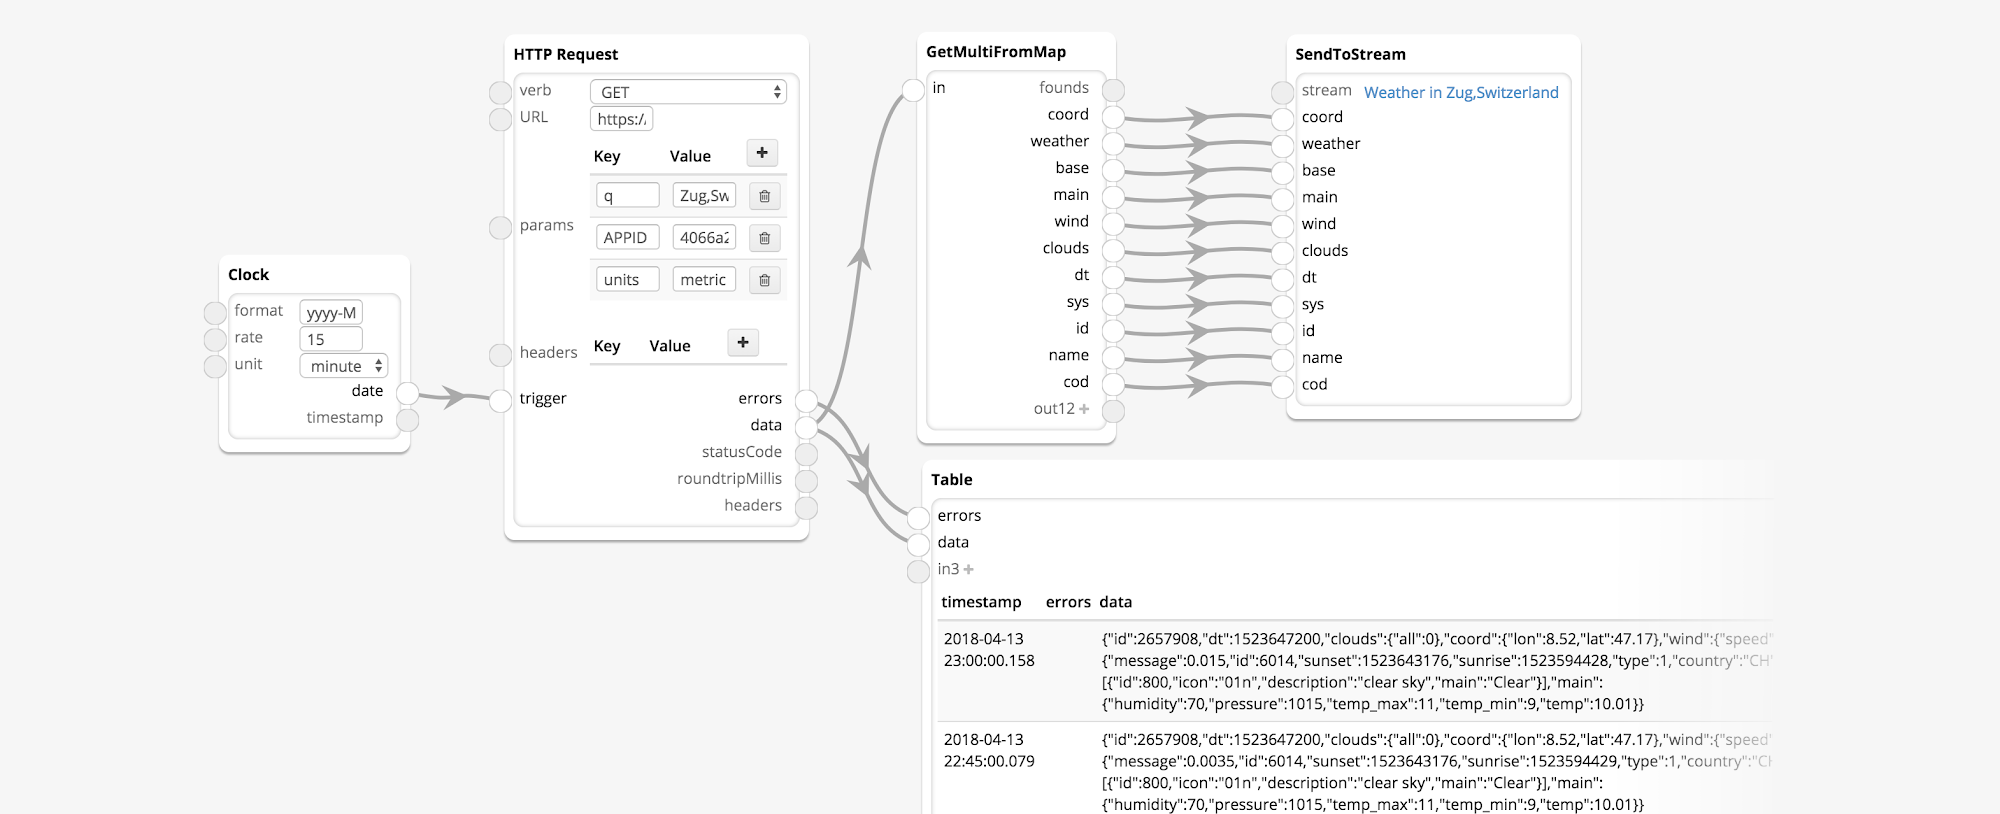
Here, the Clock module ticks every 15 minutes and triggers the HTTP Request to get the data from OpenWeatherMap. The fields in the data are delivered to the Stream by the SendToStream module.
What Next?
Now that you’re getting used to creating Streams and populating them with data that’s potentially useful or valuable to others in the Streamr ecosystem, you might want to share them on the upcoming Streamr Marketplace. In the next post we will show you how to create Products out of the Streams you maintain. That tutorial is due out around the time the Marketplace launches in mid-May, so stay tuned!
As always, feel free to drop into our Telegram, and Reddit channels for a technical discussion, or follow us on Twitter.