Most technology products that are purported to be easy-to-use are oftentimes not so in practice. The reality is that what tech people think is “easy” is not the same as what grandma thinks is easy. Grandma was not going to explore the Web in 1993 by using the command line. She was not going to send a file to her friends using FTP. And even years later, she was not going to visit a website by typing the URL into an address bar. To address these gaps in usability for the everyday user and gain mainstream adoption, product builders had to keep simplifying.
Occasionally, revolutionary products are developed that cross the chasm of accessibility. With an iPad, grandma could finally use email and surf the Web. Indeed, when a technology becomes truly easy-to-use, it becomes potentially accessible to billions of people. The transition from a niche product to one that can tap the huge global consumer market represents a massive scaling opportunity.
Building a website — while not as simple as simple as sending an email with an iPad — has long been made much easier than in the early days given the advent of “no code” tools. In turn, the elimination of the need to learn HTML and CSS helped spur a proliferation of new websites.
“No code” tools are becoming more common in other areas as well. Streamr, a real-time streaming data platform, has developed Streamr Core, which allows builders to use “no code” tools to build functionality around their real-time data streams including integrating geographical maps, charts, Ethereum contracts, and many other items. To be sure, this will help developers using the Streamr stack build products faster.
What’s more, a recent blog post showed how using “no code” tools from a service called Integromat could make the whole process of creating a stream absolutely code free. We decided to try it out and it was relatively straightforward to use. In just 10 minutes, we were able to create a real-time stream and publish it to the Streamr network, where anyone in the world could subscribe to it for free.

While many could do this with little-to-no help, we decided to make things even a bit easier for anyone who would like to try. In this example, we’ll go through a step-by-step process creating a stream that outputs all tweets with mention of the phrase “Golem Network.” For those of you not already familiar, the Golem Network is a decentralized global sharing economy for flexible, reliable and cheap computing power — or in other words, AirBnb for computing.
Before we begin our journey, the short video below shows the real-time data stream that we will have created at the end by running the Integromat canvas.
Ok, let’s start!
Steps:
- Create a free account on Integromat and then click on “Create a new scenario.” Next, select the icons, HTTP, JSON, and Twitter and then click “Continue.”
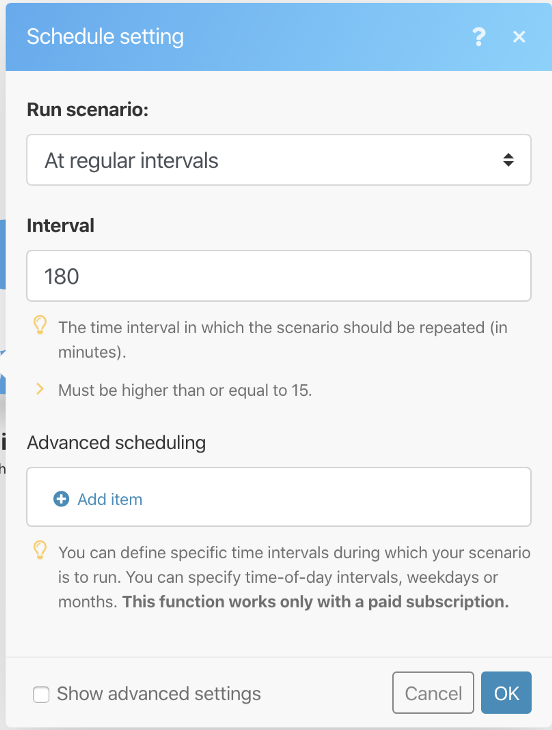
- On the next screen, you will see a black clock. Click it and enter “180” in the Interval box, as pictured below (Fig 1), and then click ‘OK’. This will make the real-time stream execute every 3 hours. We could run it every 15 minutes instead, but then we would quickly run up against our free-tier subscription limit.
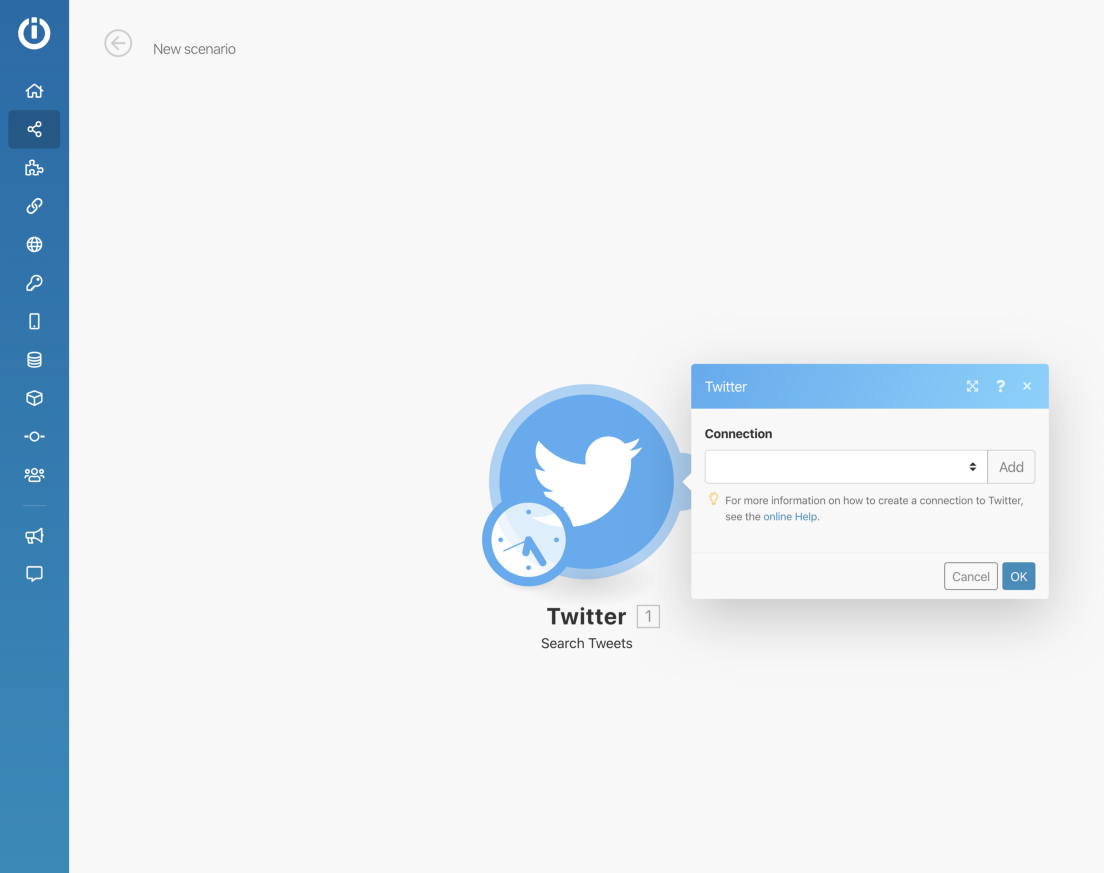
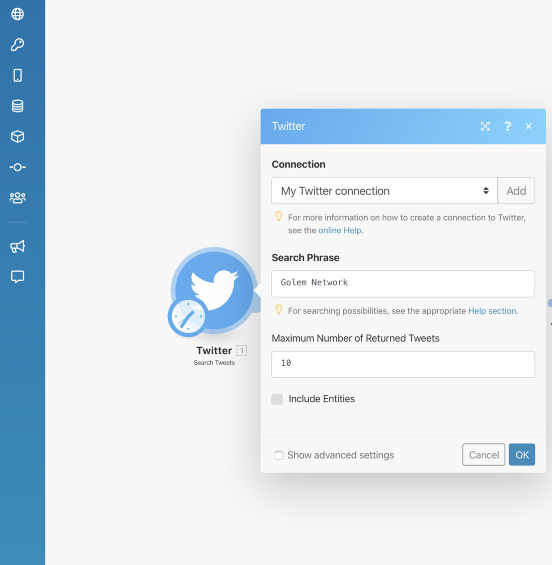
- Next, we build the canvas and connect the different modules we will be using. First, click on the question mark next to the black clock. A box pops up and then click on the Twitter module, then click on “Search Tweets.” Then click “Add” in the pop-up box (see Fig. 2) and proceed to provide the login info to your Twitter account and click “Authorize app.” If you don’t already have a Twitter account or wish to provide access to it, you can quickly create a new one. In the box that pops up, type “Golem Network” (as seen in Fig. 3) and click ‘OK.’
- Click on the semicircle on the right side of the Twitter icon. It will let you “add another module.” On the bottom of your screen is a green square entitled “Tools.” Click on it, then choose “Iterator.” Then click on the middle of the Iterator circle and click “Connect automatically.” Here, we can choose what fields we want to include in our stream by clicking in the empty box under Array. Let’s make things simple and choose “Created At,” “Text,” and “User: Screen name.” Then click ‘OK.’
- Now click on the light green semicircle on the right to add a new module. Then chose “JSON,” then “Aggregate to JSON.” When a new box pops up, click on the dropdown under “Source Module” and choose “Iterator [2].” Under “Data Structure,” click “Add” and then “Add Item” under Specification. In the box under Name, type “Golem” and in the dropdown under “Type,” choose “Array,” then click ‘OK.’ Then click “Save.”
- You should see a box under “Golem” which says “Add Item.” Click it and then click the empty box under Value. Select each of the three green choices at the top: Total number of bundles, Bundle over position, and Value. Then click “Add” and then ‘OK.’
- Next, let’s add the HTTP module by clicking on the light purple semicircle on the right of the JSON module. Be sure to choose the “Make a Request” HTTP module. Also make sure to click “Connect automatically” so that the modules are connected in a sequence.
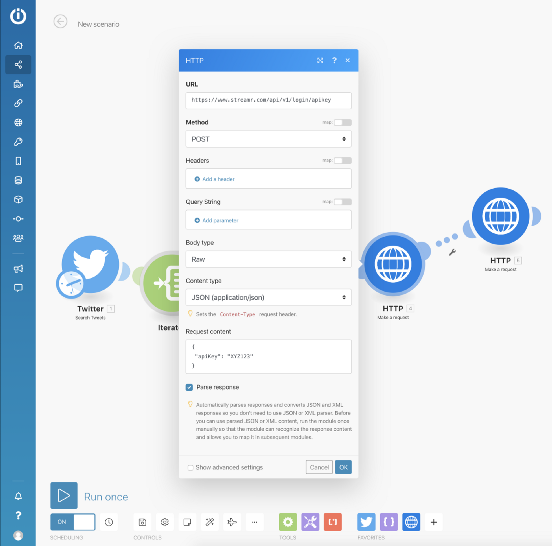
- We will come back to Integromat in a minute. But first, let’s create a Streamr account here (it’s free) if you don’t already have one and generate an account API key. Now that we have the API key, let’s go back to Integromat. Next you should see the HTTP box as seen below (Fig 4). It is time to authenticate your Streamr session token module. In the URL box, copy/paste this: https://streamr.network/whitepapers/api/v1/login/apikey. Under the Method dropdown, choose “POST.” Next, skip to Body Type and choose “Raw.” Under the Content Type box, choose “JSON (application/json).” In the Request Content field, copy paste this: { “apiKey”: “XYZ123”}. Now, you need to replace XYZ123 with your actual Streamr account API key. If you have already created the stream, do not use the stream API key here — only the account API key. Lastly, make sure the Parse Response box is checked and then press ‘OK.’
- Now let’s add another HTTP module by clicking on the light blue semicircle on the right of our existing HTTP module. We will again choose the “Make a Request” HTTP module. Connect it to the last module if it isn’t already.
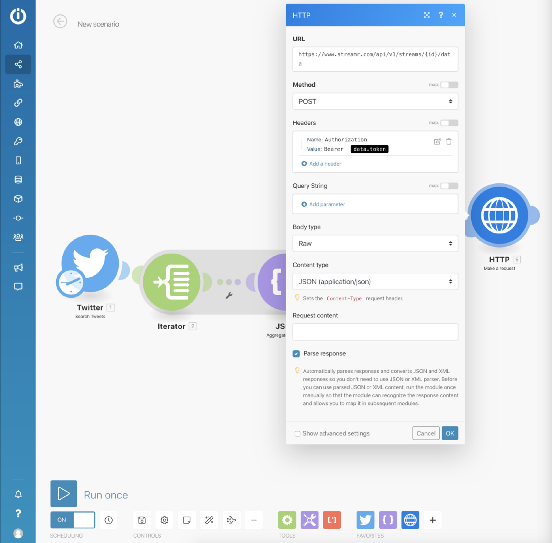
- Now another HTTP box should appear as seen below (Fig. 5). In the box under URL, copy/paste this: https://streamr.network/whitepapers/api/v1/streams/{id}/data. Now you must replace {id} with the Stream id. We must quickly setup the stream by going here and clicking “Create Stream.” Give your stream a name and description and then click “Copy Stream ID.” Now, go back to the HTTP module and paste it as stated above.
- Under the Method dropdown, choose “POST.” Then skip to Body Type and choose “Raw.” For Content Type, choose JSON (application/json). For Request Content, choose the purple highlighted “JSON string.” Lastly, make sure the Parse Response box is checked and then press ‘OK.’ Now click the “save” icon on the bottom of the page and click the blue box to the left of “Run Once.”
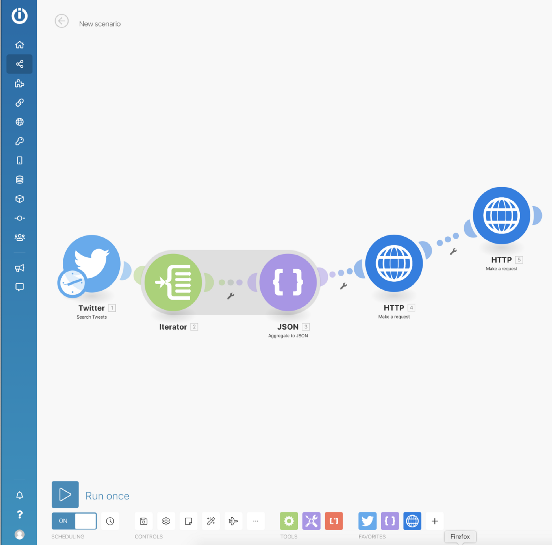
- Now click on the last HTTP module again. In the box under “Headers,” click “Add a Header.” In the box under Name, type “Authorization” and in the box under Value, type “Bearer” and hit the space bar twice. Now click the dark blue button on the left under Data which says “token.” Now click “Add.” Again, double-check that the Parse Response box is checked and then press ‘OK. Now click “save.” Finally, on the bottom left of the screen, turn on the “Scheduling” toggle, if it isn’t on already. Your canvas should look like the one below (Fig. 6).
Congratulations, you have set up a real-time Stream! You can check on it by clicking the dropdown to the far right of your stream and choosing the “edit” option. Scroll down to the Preview section and click “Inspect.”
While this process involved a dozen or so steps, it should have been fairly straightforward. Is it grandma-ready? No — not yet, anyway. But these tools and their continued improvement will enable many more people — not just software developers — to create real-time data streams.
Indeed, as the development and use of “no code” tools grows, the process of creating a stream should become even easier. This increased accessibility will, in turn, cause an explosion of creative and enterprising people building products that we cannot even imagine today and were once only buildable by software developers. What real-time data stream will you build today?